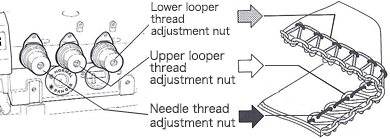
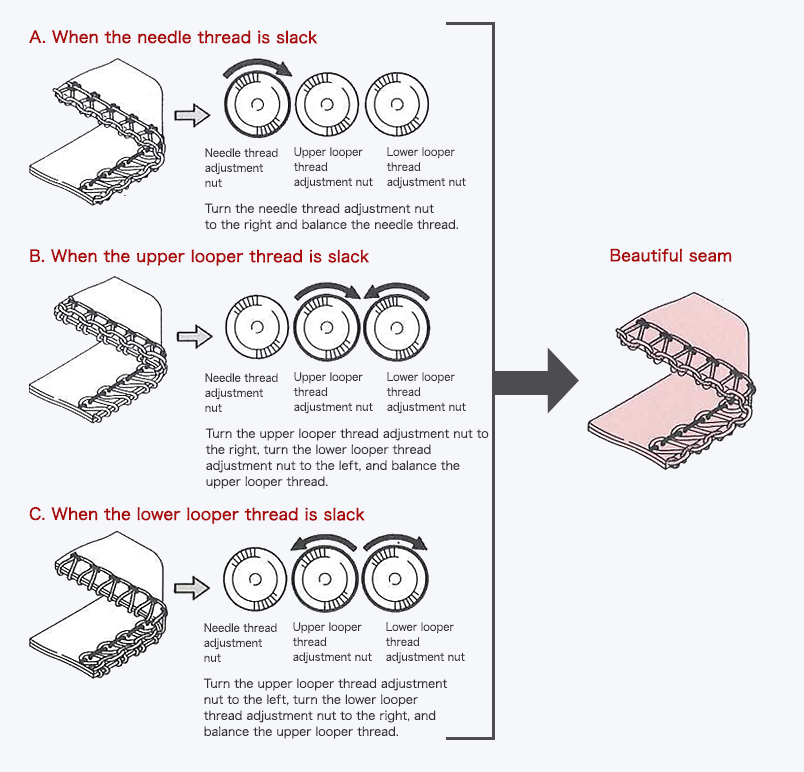
Even Tension between Threads (Plain seaming)
Good stitch performance (seaming) requires a stitch which has sufficient needle thread tension and the interlocking of the upper and lower looper threads well-balanced at the cloth edge.
Adjusting Differential Device
Knit fabrics stretch well, and woven cloth does not stretch. When sewing woven cloth and knit fabrics on the same machine, there is a tendency for cloth to shrink while knit fabrics stretch. For this reason, a differential device is provided on the machine (especially for knit fabrics).
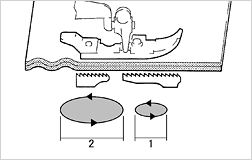
An overlock has two feed dogs, one in the front and one in the rear.
The front feed dog is called the differential feed dog the rear feed dog is called the main feed dog. The rate of movement of these two feed dogs is adjustable. Woven cloth which tend to shrink require negative differential to be stretch sewn, and when knit fabrics which tend to stretch require positive differential to be shrink sewn.
※When the differential device is adjusted, the feed effect and the stitch length both change.
Always sure to adjust the stitch length after adjusting the differential.
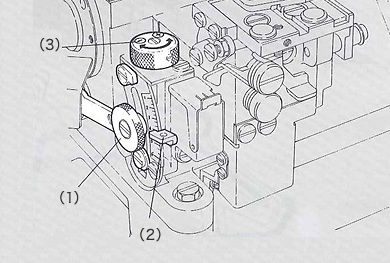
Open the cloth plate and you will find the adjustment section. Make adjustments each time the fabric to be sewn is changed. This is something which you are responsible for adjusting, so learn how to do it well.
Loosen nut (1), move lever (2) up and down, and make either gathering or stretching adjustments. Fine adjustments can be made with dial (3).
Make the value larger to gather (shrink) the seam, make the value smaller to stretch the seam.
Positive differential (Knit fabrics)
For every 2-cm of fabric fed in 1-cm is fed out. The result is a gathered seam.
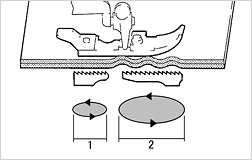
Negative differential (Woven Material)
For every 1-cm of cloth fed in 2-cm is fed out. The result is a stretced seam.
Overedger maintenance
Check points in case of machine breakdown
- Is the threading correct? Have the threads been passed through the thread retainer?
- Is the thread tension too slack or too tight?
- Are the neddles bent? Are the needles correctly inserted to the required depth?
Overedger cleaning method
- Turn the switch off. (Completely stop the motor.)
- Raise the needle bar to its uppermost position.
- Open the large cover cloth plate.
- Detach the presser foot and swing it to the left.
- Remove the needle plate. (Be sure to put the screws in a safe location so you do not lose them.)
Clean the space left open for the feed dogs. (Be sure to clean the space once every other day.) - Wipe off the dust on the needle plate.
- Clean the area of the needle plate. (Be sure to also wipe off the dust on the needle bar.)
- Fit the needle plate.
- Align the needle drop point.
- Attach the presser foot and close the large cover.
- Turn the pulley by hand and ensure a thread chain is formed.
- Turn the switch on, stitch the fabric, and Leave it under the presser foot.
- Turn the switch off.
- Lower the needle to its lowermost position.
- Place the cover the machine.
- Wipe off dust on the table.
- Clean the floor and neatly put a way the half-finished product.